Introduction[]
Hello! In this tutorial, we will explore how to make your own custom sword that applies a buff to the player when they hit an enemy. This covers the topics of adding graphics, compiling mods, changing ini files, and writing a very basic C# script.
This tutorial builds on the concepts covered in How to Make a Basic Item, so it assumes you had no difficulty with that one. If you find anything confusing, be sure to read it if you have not already!
Make sure to use the Modpack Builder!
Video Tutorial[]
Requirements[]
- tConfig must be installed correctly. When you run the game, it should display "tConfig" and a version number in the corner of the main menu. See Install Guide for more details.
- You will need the default items if you don't have them already. You can download them on the Resources page.
Creating the Sword[]
- We want to make a sword. Let's pick a fairly generic one to copy for our purposes: Light's Bane. Find the .ini file and copy it into your Item folder.
- Rename the file to Defender's Sword.ini. Later on, we'll make it give the Ironskin Buff, but for now, we want to make it easily crafted. First, open the ini file up and change type to -1, damage to 12, and value to 8000.
[Stats]
width=24 ; width of the sprite (pixels)
height=28 ; see above
type=-1 ; so you are'nt changing the default items
useStyle=1 ; swing animation
useAnimation=20 ; how long it takes to swing it 1 times
useTime=20 ; like above, a bit more info needed
maxStack=1 ; maxstack
damage=12222222222 ; damage of the sword
knockBack=5 ; knockback
scale=1.0 ; the scale of the item (width and height is for scale 1.0)
useSound=1 ; sound effect when using
rare=2 ; color of the name (set to 2 or higher to prevent it from burninig in the lava)
value=8000 ; the item's value (PPGGSSCC -> platinum gold silver copper)
melee=True ; melee damage
- If you're wondering about the different attributes here, you can read about the full list of possibilities on the Item Attributes page.
- Next, we will now adjust the recipe to be easier to craft. Again, you can set it to something very simple such as 1 Wood for testing purposes, and then balance the item later. You can also use Yorai's Final Cheat Menu to spawn the items in.
[Recipe]
Amount=1 ; The amount got by crafing.
needWater=False ; Does the recipe require you to be near water?
Items=8 Iron Bar ; Items needed to craft.
;(Don't set a space: item1,/*here*/1 item2)
Tiles=Anvil ; The tile where it can be crafted.
Adding the Graphics[]
- Just like in the other tutorial, we have set up our item's ini data. Now we need to give it an image to use. Download this image, and save it as Defender's Sword.png, in the same folder as the ini file.


Defender's Sword Made by:Virtulox
Using XNB_Exporter can also be very helpful. What it does is basically converts the XNB files into PNG so it is editable and viewable. (http://mirror.dataorb.net/XNB_Exporter.zip) There is no reliable tool to convert PNG files back into XNB format, but it is fortunate that this is not necessary.
Creating the Effect[]
The reason we will make the sword buff the user instead of debuffing an enemy is actually rather simple: since we have an icon when we're buffed, we will immediately know when it works. So, how do we make the game know to buff the player? It's pretty easy, but might look more complex than it is: we have to write a C# script.
- Open notepad or your text editor of choice. The same one that you use to edit .ini files will work.
- Now, simply copy and paste the following code into the file:
public void DamageNPC (Player myPlayer, NPC npc, ref int damage, ref float knockback){
          // Add the buff
          myPlayer.AddBuff (5, 600);
}
- Choose File, then Save As, and name it Defender's Sword.cs. Again, this should be beside the other two files. They should all have the exact same name, but with different file extensions.
- A not-so-brief explanation of what is happening here:
- First, just look at the curly braces {} - these are used to group code together. The very first line is a function definition, and we're saying anything in the braces belongs to that function.
- There's a lot of stuff going on behind the scenes, but when we say "DamageNPC" we're signalling that we want a function to be called. When the game determines the time is right, it will do everything we tell "DamageNPC" to do. In this case, adding a buff.
- "public" means that any code can access the method. This is important! If we forgot to put that in, or said "private", nothing else could access the function, meaning it would never be called, and our buff never added.
- "void" means that DamageNPC does not return a value. Some functions will return true or false depending or whether they were successful, other numbers, or even entire objects.
- For "Player myPlayer", "Player" is the type of object being created, and "myPlayer" is the name of it. Another way to think of it is that myPlayer is a Player. (If you want to set it to add the buff to the npc attacked, replace "myPlayer.AddBuff" with "npc.AddBuff".)
- "// Add the buff" is simply a comment. The game ignores these, but it lets you make notes on the code and organize it better.
- Finally, "myPlayer.AddBuff (5, 600);" is a statement. We are calling a function named AddBuff, which belongs to "myPlayer". We are giving it two values, 5 and 600. What do these mean? If you refer to other documentation, you will see that 5 is the buff type for Ironskin. 600 is the length of time the buff lasts. There are 60 frames per second, thus 600 frames would become a 10 second buff.
- That was probably a lot to take in, but the big thing to take away from that is that the first line was the function header, that we receive data from, and the body of the function processes the data and does stuff.
- One other thing you could do is have it be a random chance of applying the buff. The easiest way to set this up is by making it a 1-in-__ chance. For example, if you wanted a 1 in 10 chance (which is 10% of the time), you could put this as your .cs code instead:
public void DamageNPC (Player myPlayer, NPC npc, ref int damage, ref float knockback){
    if (Main.rand.Next(10) == 0) {
        // Add the buff
        myPlayer.AddBuff (5, 600);

    }

}
Testing the Sword[]
- If everything has been set up correctly, you should be able to simply run the Modpack Builder, choose your mod's number, and compile it. It will then generate it for use in the game.
- If you're not successful, it should return with a reason why. If you see a bunch of gibberish, try to find a part that has two numbers in brackets, such as (6, 18). This is the position in the text where the .cs code broke. It will also say something like "; expected". This helps you find out where it went wrong and why!
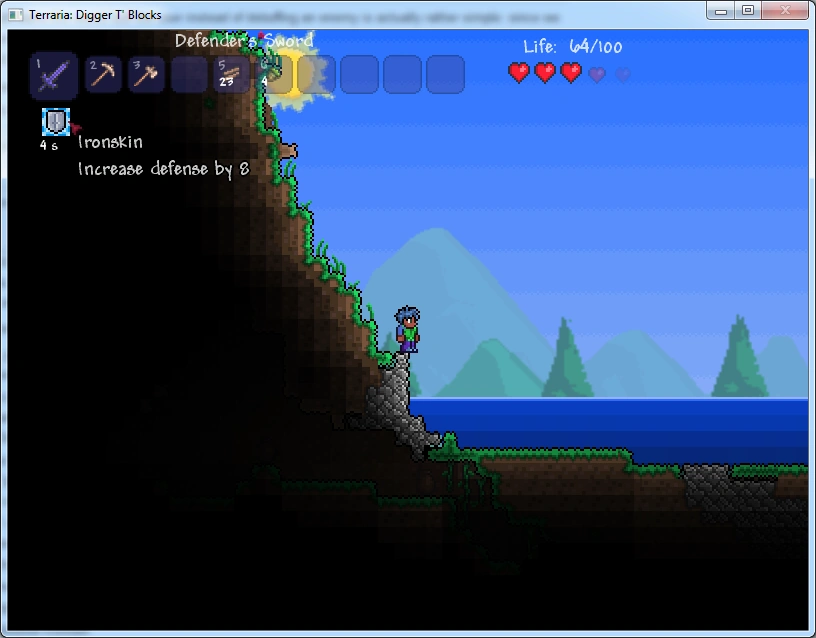
- If you successfully crafted your sword and attacked something with it, you should see something like this:

Final Words[]
Hopefully you will have been successful in creating your sword. Ideally, what you will have learned from this tutorial is that scripting, while intimidating, is actually pretty simple. There are a ton of resources available for learning the different scripts. You could try playing around by adding different buffs or debuffs with the sword, or maybe even try making your own!
- If you had any issues with this tutorial, you can get an example here